Saving the Organization and Edits You Made While Traveling
In a prior article, I showed you a system for backing up your photos while on the road. That system boils down to making 3 copies of your photos, one of which is on an external drive that you can easily plug into your home computer and download all your pictures onto that computer. So the transfer of photos from your laptop to your home computer is easy.
But I didn’t show you something that is important to many photographers: transferring your Lightroom catalog. Most photographers use Lightroom to organize and edit their photos these days, and if you did any such organizing or editing on your laptop while you were on the road, you probably want to transfer that to your home computer.
Unfortunately, Lightroom does not make this seamless or intuitive. However, if you follow the steps I show you below, it will be easy. In the rest of this article, I will show you how to do it.
Part 1: Adding Your Photos to An External Drive While Traveling
This process starts as soon as you sit down to save or backup any of your pictures while you are traveling. First, just copy your photos from your memory card over to your laptop and – importantly – to your external hard drive. As mentioned in the prior article, you will still keep a copy on your laptop, but the copy of your photos we will use for the remainder of this article is the copy on the external drive. This part is likely nothing new for you, but here is how my screen looks when I copy the photos to my external drive:
This is the screen on my laptop when I copy the images from my SD card over to my laptop. I have created a folder number that fits in with how I label my folders on my home computer (starting with the date, followed by a short description). This will be helpful when I get home as it will fit in with the rest of the folders on my home machine.
The next thing to do is to create a new Catalog in Lightroom on your laptop. Do it right away as soon as you add pictures to your drive.
Creating a new Catalog is easy, you just go to the File menu and choose “New Catalog.” When you do that, a dialog box will appear, which will allow you to choose where this new Catalog will be stored and what it will be called. What you call it is up to you and can be anything, but where you store it is important. Make sure you store your new Lightroom Catalog on the same external drive where you are storing your pictures.
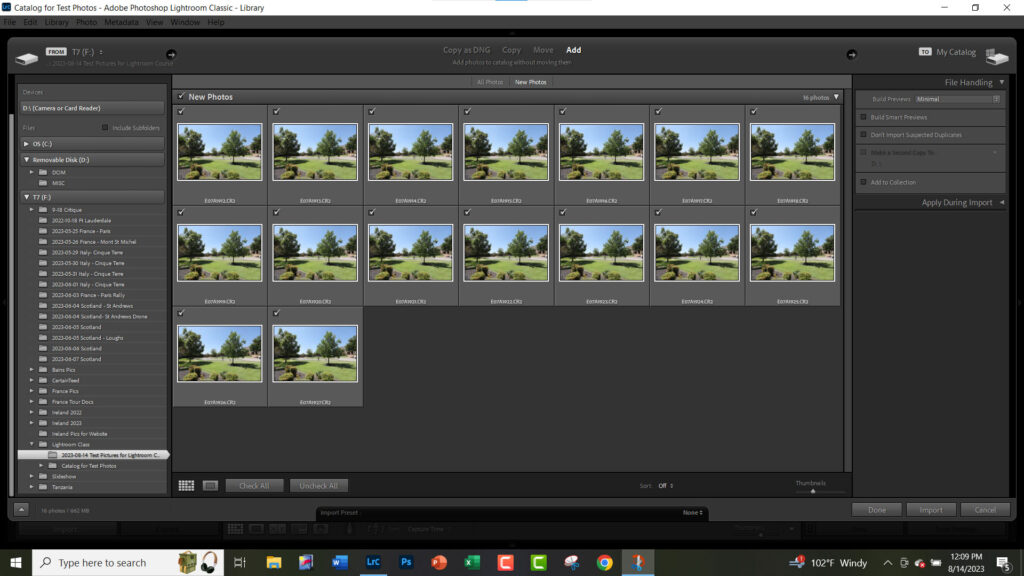
Here I have gone into Lightroom on my laptop and am preparing to create a new Catalog (File > New Catalog). Here you get to label the new Catalog, and I'm calling mine "Catalog for Test Photos" as you can see in the field toward the bottom. The important thing is where I am saving the folder that will contain this Catalog, which is on the same external drive where I backed up my pictures. This will make it easy to transfer everything later.
Now that you have created a Catalog on your laptop, you’ll need to add photos to that Catalog. You will just import your photos as you normally would (File > Import Photos and Videos). Be sure to set the process to “Add” the photos to your Catalog (not copy or move them). Here is what that will look like:
Here I'm importing my photos (all the same since this is just for demonstration purposes) into my laptop, as I would do when traveling. The main thing to note here is that you "Add" the photos set to your Catalog (not copy them, unless there is some other reason you want another copy). Notice how the word Add is highlighted at the top.
Once that is done, you can merrily organize and edit your pictures as you go along on the trip. Import additional pictures into this Catalog as you take them. Be sure to store the photos on the same external hard drive. This will make things simpler when you get home. You don’t need to do anything different or special until you get home.
This screen is just showing you that I made edits to these photos. I tried to make the edits fairly dramatic so you could see them. This is just so, at the end of the process, you can see that Lightroom is, in fact, transferring all your edits to your home computer.
Part 2: Transferring Everything to Your Computer When You Get Home
When you get home, you are going to plug your external drive with the photos and the Lightroom Catalog into your home computer.
This is just me plugging in my external hard drive into my home computer.
What we will do now is add the Catalog you created on the road to your home Catalog on your home computer. Doing that is simple.
First, open Lightroom on your home computer and go to your Catalog. Now you will import your “Road Catalog” into this “Home Catalog”. To do that, just go to the File Menu and choose “Import from Another Catalog.”
A dialog box will appear, allowing you to select the Lightroom Catalog from which you want to import. Now just select the Catalog you created on the external drive.
When you do, notice that Lightroom will select that Catalog and it will also list the folder where the pictures are located. That leads to one very important selection you need to make on this dialog box. Where is says “File Handling” you should select “Copy new photos to a new location and import.” Then you will tell Lightroom where to put those photos.
It will look something like this:
This is the dialog box that appears, where you select the Catalog you want imported into your home Catalog. Just select the Road Catalog from your external drive. But you can also save yourself a step by having Lightroom copy the underlying photos to your home computer as well. To do that, where it says "File Handling" select Copy new photos to a new location and import." You then choose the location just underneath that. I organize all my photos by date, so you can see I'm having Lightroom put this folder of photos within my "2023" folder.
And with that, you are done. Your photos are moved to their new home on your home machine and your Lightroom changes are moved from your laptop to your home machine. Here are the results for me:
Notice two things here. First, notice that the folder with the pictures is placed neatly within my existing organization. I save by date with a description at the end, and Lightroom put the folder where it is supposed to go. Second, notice that the pictures on the screen are clearly edited, so we know that Lightroom moved my changes over to my home machine.
A few cleanup items before I go.
First, if you didn’t have Lightroom move your photos when it imported the Catalog, you can do that manually. Just select the folders you want moved from your external hard drive and drag them to the folder(s) you want on your home computer. If you don’t have folders set up, go ahead and create them and then move them. You can do this however you want, but it is important that you use Lightroom to move the photos. If you don’t, then Lightroom won’t know where the photos went.
And finally I want to point out that this whole process assumes that you are going to transfer your photos to a home machine with its own storage. Some people work entirely from external hard drives. If this is you, then you really don’t need to go through this process. You can just plug in the external hard drive to your home computer and access both the pictures and/or the Lightroom Catalog from there. I don’t do that though, because I like to have quick access to all my photos at any given moment.